
hh&c fan
-
Posts
236 -
Joined
-
Last visited
Content Type
Forums
Profiles
Blogs
Events
Gallery
Posts posted by hh&c fan
-
-
Alright it's time for some news! After a lot of trying and failing I'm now able to show some real news. First I want to introduce two materials I found to be kinda useful. One material's called "Plaast", it's a polymorph polymer plastic. No smell, no toxics and easy to use. At room temperature it's a firm and minimally elastic plastic. Very strong and almost unbreakable. But when you heat it to ~60°C (just put it into hot water), it melts into a very smooth, chewing-gum-like mass. Second one's "industrial clay", made by Chavant and some other manufacturers. After testing Plaast I found it to be useful for some porposes but not for all. More on that later. Industrial Clay is used for building prototype models in automobile industry, sculpting etc. At room temperature it's stable and waxy. Depending on which clay you buy, it's cooled down consistency is almost comparable to wood. It can be carved, nailed, drilled etc. When you heat it to 40-70°C (depending on brand and product) it gets smooth and you can apply more material and shape it without any restrictions. Some clays can even be heated until they melt and then be poured. Both materials can be heated and reshaped unlimited times. First I tested if Plaast would be useable for designing and/or casting the lasts, heels etc. Turned out it cools down too fast (just 1-2 minutes of working time) to be practical. Additionally hot Plaast will not coalesce with cooled down Plaast. Still there's a useful purpose for it. You can build a temporarily half-closed negative form and check if the basic shape fits you feet well
 ----
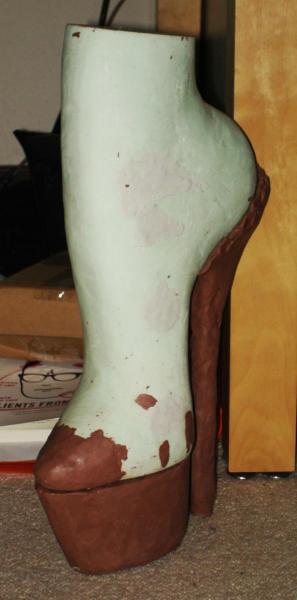
I'm still doing small refinements on the last. Currently reworking the toe tip.
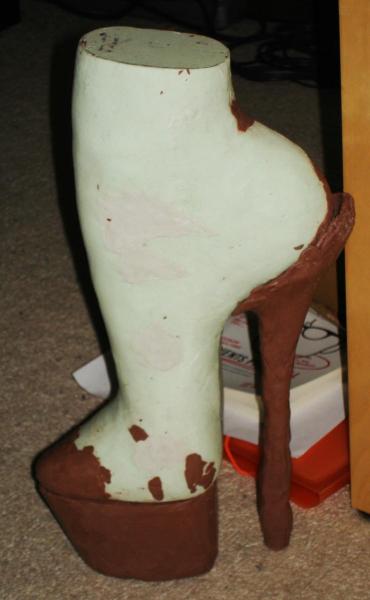
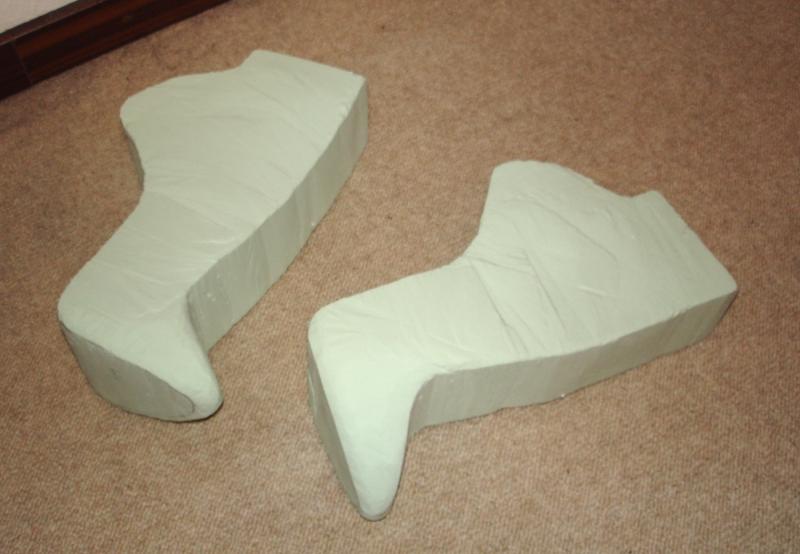
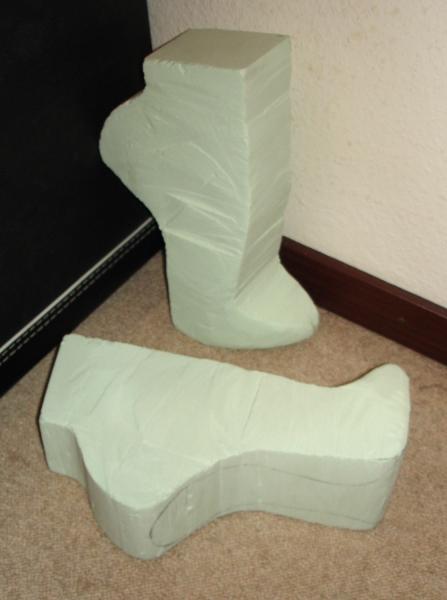
Using Clay, a 10mm aluminum rod and some hard foam filling I blocked out a heel and a plateau prototype.
I'll get them into shape in the next weeks.
Additionally I found some fantastic silver leather I'll use for the inner.
----
I'm still doing small refinements on the last. Currently reworking the toe tip.
Using Clay, a 10mm aluminum rod and some hard foam filling I blocked out a heel and a plateau prototype.
I'll get them into shape in the next weeks.
Additionally I found some fantastic silver leather I'll use for the inner. -
Sometimes you just can't find what you want. Over the years I've made several attempts at making my own heels, but was never able to accomplish anything durable. Does anyone have any experience at making their own, without the use of power tools?
Can you be more specific about what was your problem?
Power tools -- you'll need to use at least a sewing machine. Everything else can be done by hand (however you won't be able to use steel shanks)
-
I don't own any heels of the Dagger line but I know they're higher. While the Domina series is told to be 6" high they are more like 5"... Dagger seems to be a remake of the 6/7" Hollywood Heels/ The Highest Heel design.
-
Nice to see that you are still active on your project.
By all the work you did so far a wooden last maybe could have already been carved by you. I am sure that you will be able to do that. It only will take a bit longer than carving the hard foam.
Well it took a lot of corrections to bring the hard foam to shape. Think wood would have taken a lot more time.
After all the hard foam might even work as wood replacement. I don't try this at the moment because I'd risk the work of the last months...
Today I made a partly mold of the last (just sole, heel & toe box so that it's kinda like a pumps negative) and tried the fit with my feet. After a few more corrections I'm going to begin casting the final lasts tomorrow.
I also bought some more of the needed tools, did some early pattern creation and tested the flexibility/ability to stretch of the leather.
Gonna post some photos of the final last tomorrow. It's something slimmer than the previously shown versions and I was able to make the toe box even shorter. Looking forward to the next steps...
-
It's all to do with balance. A foot does not "behave" like a last does...
Yeah right. Still I cannot guess what took them 18 months. (ok 18 months sounds like a lot but on the other hand it's also possible they had only time for one new last per month or anything.)
Either way one might find a lot more problems when the first prototype is finally done.
Hmm maybe I'll give ballet heel making a try when I finish my current project successfully. Just as a careful experiment and challenge.
-
Good luck... if you find some1 selling 6"+ heels please tell me. Don't try to use just a 1:1 foot mold as last. A foot fits into a shoe but a shoe isn't shaped like a foot! Dr. Shoe... weird. I cannot imagine why it is that difficult to shape ballet heel lasts. Recalling the shape of my owned ballet heels (Pleaser, Kassiopeya/cheap chinese brand) the last shape must have been rather simple. Or are you talking about the difference between a cheap ballet heel last and the ones from a quality shoe maker like LSB?
-
Preparing for the next steps. Few days ago I decided NOT to use TecClay as it possibly isn't strong enough. Instead I'll try if nailing actually works (after all you have 4-5mm of sole leather which can be used for driving in nails) and/or string lasting. Does someone here have experience with string lasting? One general note... these hooks http://footcom.co.nz/uploads/Products/product_410/Lace-Hook-2-pc-(3).jpg were initially called ski hooks. However they are rather hard to find and known under several names. Boot hooks, Ski hooks, Rivet hooks, I got the best results with "Lace Hooks". Boot hooks found some useful sites too.
-
Well here's the first major fail. After doing a lot of research and some chat with experienced persons about casting resin I found out the following: There's no way to drive nails into a last made from the available casting resins. I'm rather happy I found out about this before buying all the casting supplies for one or two hundred euros... Fortunately I have a better plan now. Which will also be cheaper. After all it's possible the hard foam lasts would be stable enough. But as you know from earlier posts it's not an easy material to work with. So browsing all my bookmarks I recovered a site selling "last makers clay". Actually that "last makers clay" is nothing but a professional modeling clay which is smooth at temperatures around 55-65°C but is workable like wood when it cools down to room temperature. I'm going to use clay made by the german manufacturer Kolb Technology but there're a few others available. By the way - it's called TecClay. Here's a short demonstration on how to work with this stuff.
-
Another very tiny update. Due to some unplanned financial investments I had to take a break with the project. Also time's very narrow over the last months. Anyway... I found some epoxy sculpting clay I bought some time ago. It's just like any other modeling clay. I used it to fix the mistakes where I had cut away too much. After some more grinding, the next steps can be done parallely: A - molding the final lasts/building a simple locking mechanism (the needed materials aren't cheap exactly... needed materials will cost about 150-200€. ) B - using the lasts/last prototypes to create the pattern for the foot parts C - creating the leg patterns from scratch/measurements/3D model. Happy doomsday everyone!
-
Have a similar problem and it resulted in finding work-arounds unfortunately. I'm still working on a pair of lasts (first a digital 3d-model, and after I couldn't find any1 to fraise/CNC them, I built a hard foam prototype by myself which will be used to mold the final lasts. Same method's planned for the heels. Some time ago I tried to find someone to lathe metal heels for me and again, no luck. My plan is to build the slimmer heel part from a solid aluminum rod while the curvy thicker part will be molded around it. Did you take a look at my thread (it's right here in the same sub forum!) ? Sooner or later we might have useful information for each other...
-
My hew extreme 9.5 inch sandals
Whoa they're gorgeous! From where did you get them?
-
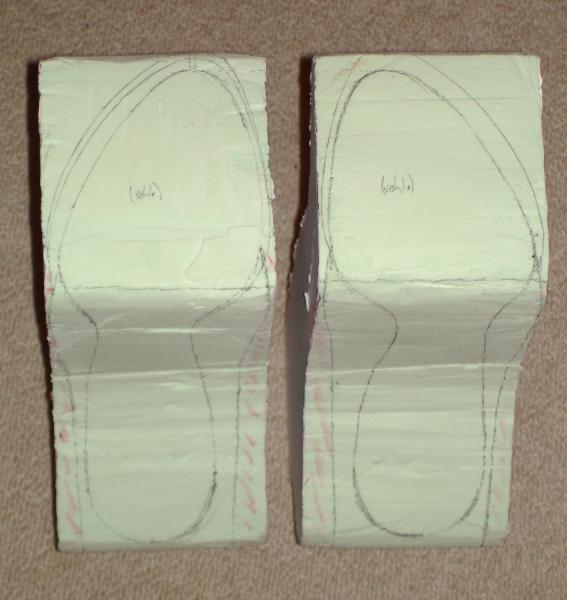
Hey! Small update. Grinded everything some days ago. Still doing some refinements (there were some minor mistakes you won't easily catch on the digital model). Next step is to buy a bit of modeling clay to fix the few parts where too much was cut away. And also some epoxy resin to seal the foam. After that, I'm ready to cast the final lasts.
-
Last modeling/Part 3 - Designing the last
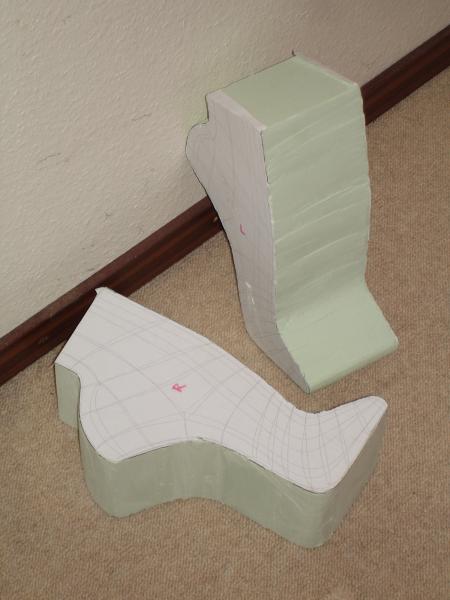
From now on it gets a bit more difficult as there's no way you could measure if you're actually doing the right thing. First I marked where the last should be widest/longest. Unfortunately I cannot show pictures with only this step. However it'll help you to get the shape right.After that, take a knife and start to cut away material where the last should be rounded. Only the parts marked as widest/longest must stay untouched.
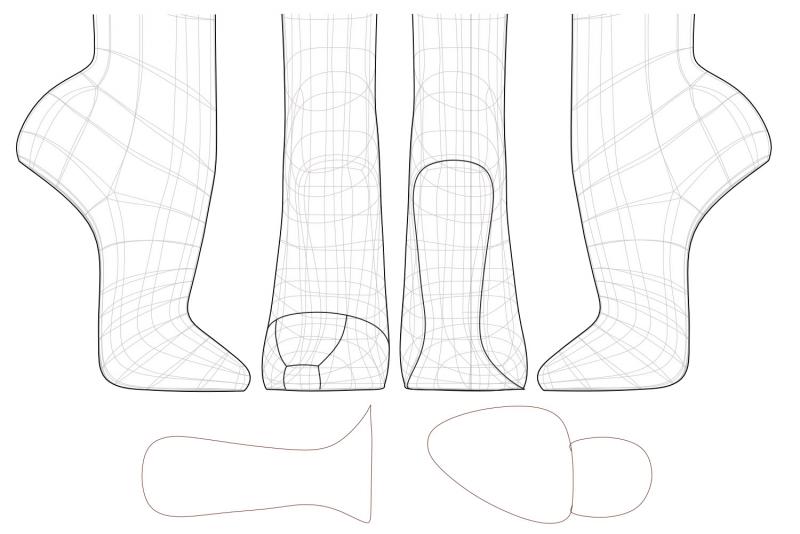
To have some reference material, I made lots of screenshots of the digital model and printed them.
Again be sure not to remove too much. Fine corrections can still be done later.
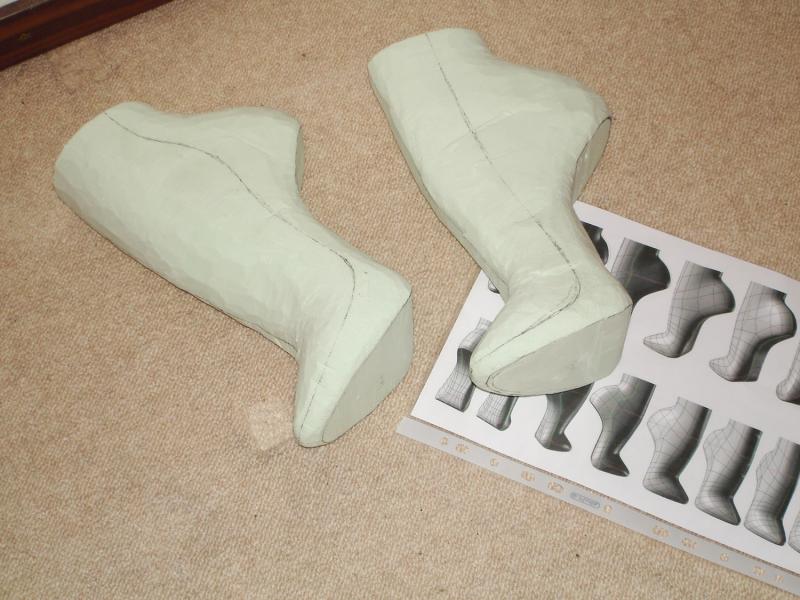
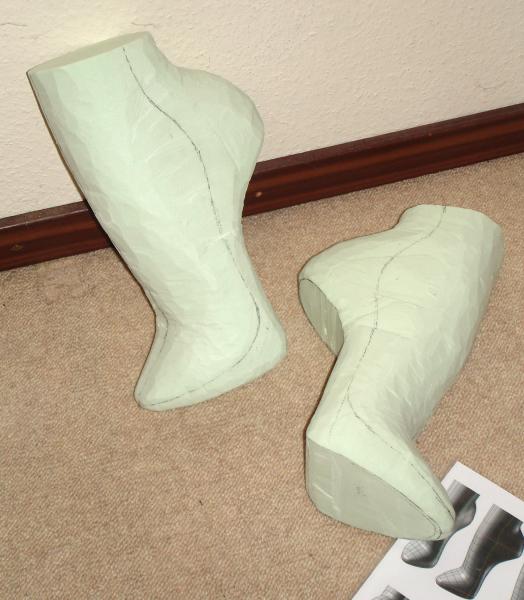
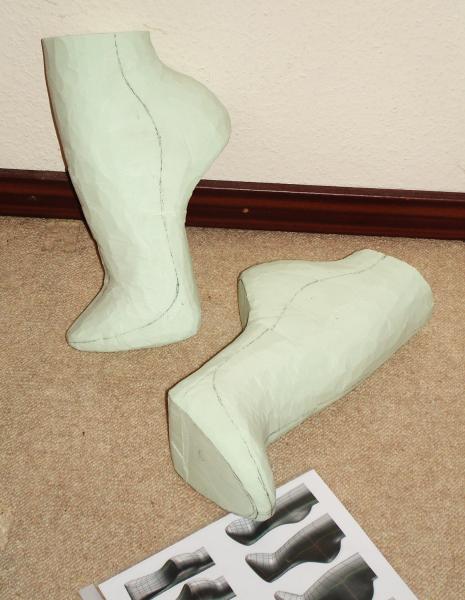
After a few hours of work, the lasts have their basic shape now!
Finally I compared the lasts to one existing pair of extremely high heels and decided I'll have to refine the shape here and there. After that step everything further will be done by grinding a lot...
-
How are you planning to get the last out of the boot?
I'll do a cast of the hard foam last. This will be done with "liquid wood", a synthethic with attributes similar to normal wood.
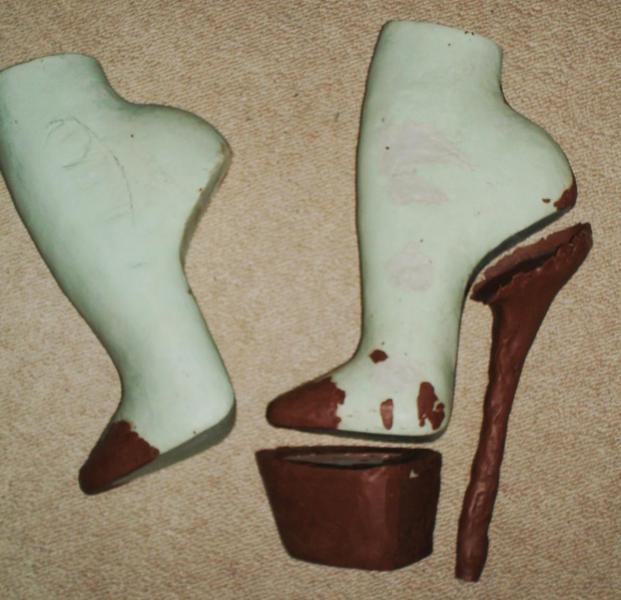
These "wooden" lasts will then be cut into three parts and I'll install a locking mechanism so that I get a result similar to a classic 3-part last!
-
Not too sure about Also keep in mind that hard foam or modeling clay is expensive too. For my project 50 pounds of clay $14 and that is even reusable. However if someone the same size really freaks over my boots I will not recycle the clay too soon.
Yeah of course... I paid about $50 for the block. However working substractive allows me to work exactly based on the blue prints while using the clay you could only shape them by eye.
-
Alright here we go. Some days ago I got the hard foam and began working on the lasts. I'll try to document most of my thoughts, steps and experiences and share them with everyone who wants to build high heels too.
Last modeling/Part 0 - Designing the last
Basically there are two ways. Either you find a last maker who sells the last you want, or you try to make the lasts by yourself. In the last case you should have experience with 3D / CAD software.
Of course you could try to model/sculpt the last without any "blueprint" but I think that would require a lot of experience, especially as you'd need a symmetrical pair of lasts. Also keep in mind that hard foam or modeling clay is expensive too.
I'll go for creating a digital last model (which I won't explain here as it's a very complex topic). Originally I wanted to send this data to a last maker or someone who can CNC the lasts for me. Unfortunately the last makers and the companies I contacted weren't really cooperative... in the way they didn't even answer. I phoned a few of them and they gave me ok to send a mail with the data. After that, again no answers.
After some frustrating weeks I decided to go for the traditional way - model the last by myself. This will require dexterity, handcrafting skills and a lot of time.
If I were you, try to find a last maker who can fraise the model/ sell a fitting last design.
Before you bagin to shape the real model you need to know what you're actually going to do. At first I created the whole boot/last digitally. By then it's still easy to change anything at it wouldn't cost you anything but a few minutes of time.
If you want to do the same thing keep in mind that
- ... the final shoe will be ~2mm thicker due to material strength
- ... the last has not only to include the foot but also the insole
- ... the outer sole will be attached between heel and last so the final product won't look like "last with attached heel". Important to keep in mind to be sure your final shoe won't look clumpy!
Last modeling/Part 1 - Basic shaping
I bought a piece of modeling hard foam. Size is 39.5 x 24.5 x 10 cm. Enough for a pair of lasts.
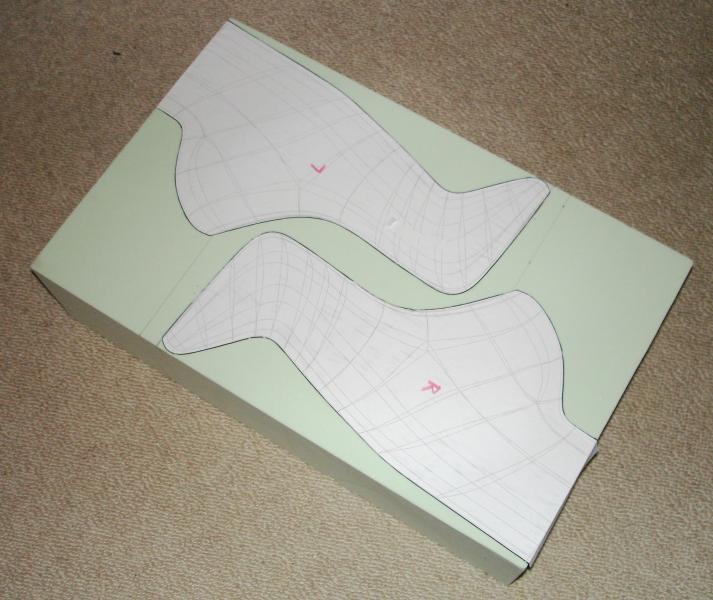
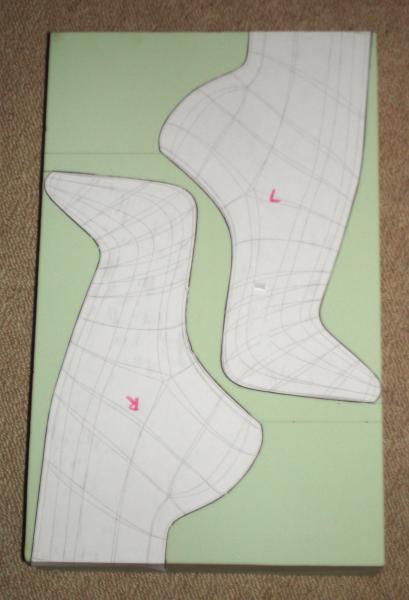
First step was to glue the side views of the model onto both sides of the foam block. You need to do this very exactly. Use a ruler and draw some guidelines.
Now I had to find out which tools work best with the foam. Progress to the following picture took me almost 4 hours. I tried various saws, knifes, cutting wires, chisel techniques and possibly some more.
After all the hard foam feels like a soft wood without any structure. A normal saw (with small prongs) worked out to be fine.
After another 5-6 hours of work, the cutout was done.
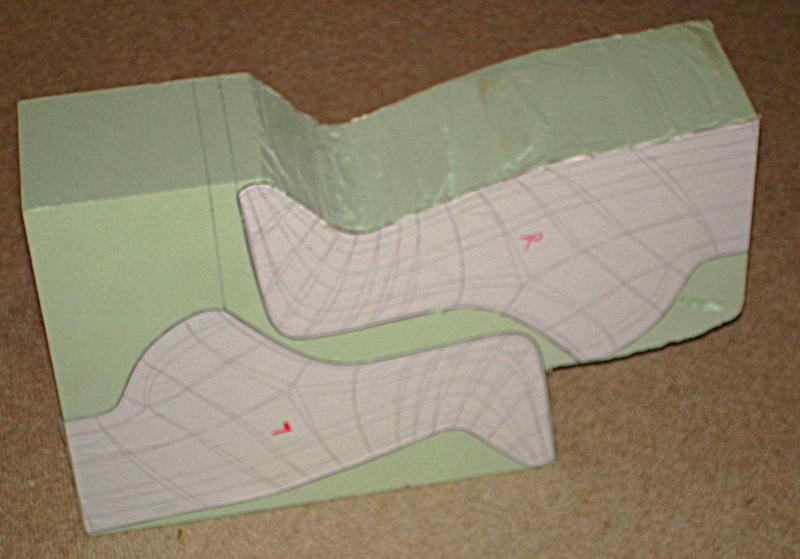
Last modeling/Part 2 - Some more cutting
Important: Try to include some padding. Later it will be sanded and then it fits. Removing a millimeter of material is a lot easier than finding out you have to add one millimeter in this case!
Applying the next view of the blueprint to the last is more difficult as it's no flat surface anymore. Use a ruler for measurements and carefully draw by eye.
Do some more cutting. Also I rounded the toe box a bit.
-
Eyelets didn't lead me anywhere useful. Mainly because I'm not looking for eyelets (like u use for corsets and some boots) but the typical boot hooks. However it seems I found a place to get them. I know where to get all the tools and materials I need but the biggest problem are the last makers after all. I contacted several manufacturers per email and phone, but even after arranging everything per phone, noone answered when I sent the last data. After some frustrating weeks I decided to create them on my own. Here's the plan: 1. print a 1:1 blueprint of the lasts 2. shape the prototypes based on modeling hard foam 3. cast the real lasts using liquid wood 4. hope it's robust enough! In a few days I'll get the foam and begin working with it. I'm going to document as much of my work as possible so that everyone interested in doing the same can use some reference material. Wish me luck
-
However don't forget that ultra high heels don't allow large steps as even the most flexible ankle joint cannot bend as far as you want to. Bending your ankles so that foot and leg is in one line is possible. For some ppl especially if they are ballet dancers even more is possible. maybe 10° more. but thats it. So when you wear 5"+ heels will be shorter than normally.Short steps are a dead giveaway that the heels are to high for your current heeling level. Walking in heels should be as natural as walking in flats. Nothing says that you can't adapt to them with practice.
-
The aspect ratio is all cocked up in that video... making the heels look far higher than they really are and the woman look like a rake.
The shoes are most likely to be by Italian Heels and are probably between 5 and 6 inches depending on the size of the shoes.
The woman in the video probably never walks in or has the desire to wear such high heels.
Don't think they're from italian heels. Looks like some Milanoo "crap". If you look closely italian heels are more well-shaped. Her shoes have almost no arch curve and no space were her heels could fit in. No surprise she can't wear them at all.
-
Not that the shoes are unattractive, just a bit odd.
yeah everything else about them's pretty nice. Maybe you could cut off the sole
-
I found these http://www.ebay.com/...=item2321b910b6
urgh a beautiful design ruined with that pointy sole
I remember somewhere there's a online shop selling these too. However at the moment I have no clue where to find it.
-
@Dr. Shoe Of course. However I'm optimistic. I'll carefully test their strength before wearing them. And after all they will only be worn inside, so no worries about bad terrain, temperatures etc. Lydia boots? -------------------- After lots of search I know where to get everything I need. Just one miscanellous thing's missing. "Shoe hooks" or whatever they're called in english. And the attachment to apply them using a rivet machine. *googling*... jep shoe hooks is right. Maybe I'll find some reseller in UK or somewhere. Now for everyone who's interested in trying the same thing: Summing up everything I have to buy, from leather over lasts, steel rods, epoxy resin to all the needed tools, I'll have to invest 400-600€, thats $500-720. Price for succeeding pairs would be way lower (if you use the same lasts etc). No need to buy all tools again, no new lasts, possibly you don't even need to buy new leather. 150€ at max I think.
-
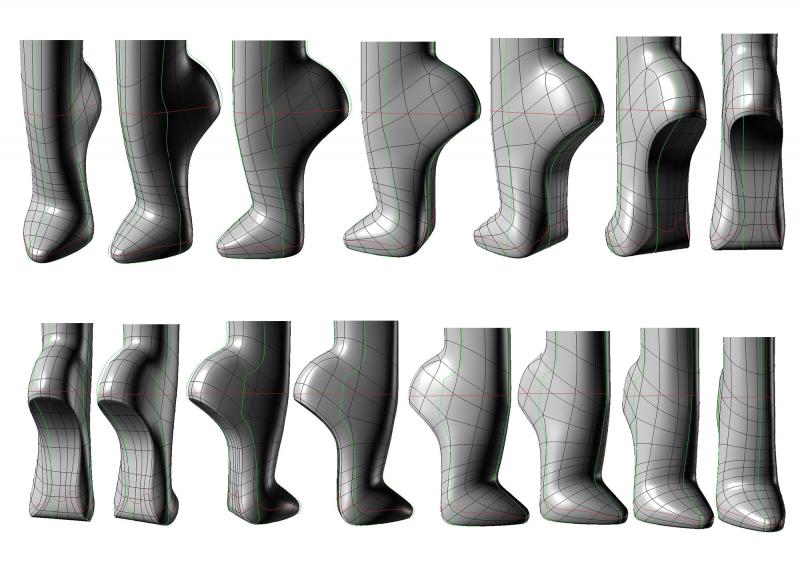
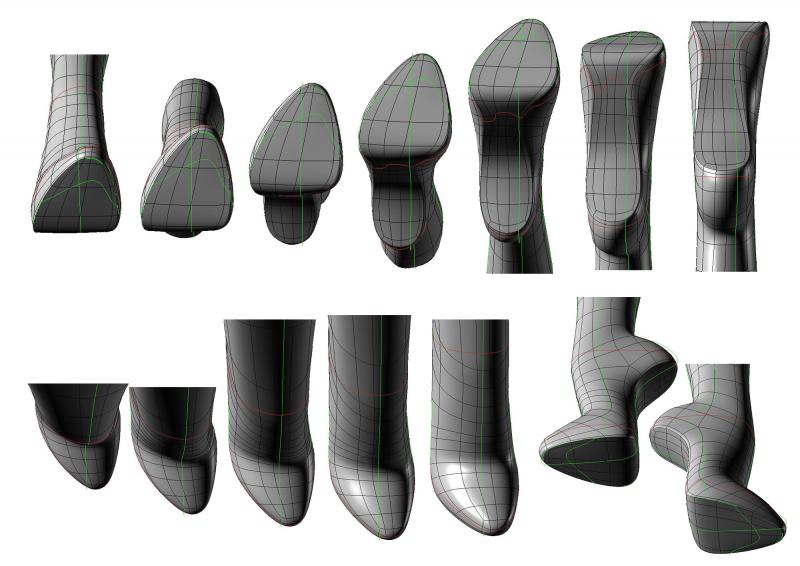
Hey everybody. Again a lot of time has passed... but I have some (small, but at least any) news. The current state of the digital model is now *perfect*. I searched for "unpretty" shapes several times over some weeks. But there's nothing to change. The curves are juuuuust right now. Attached to the post you'll find some shots of the model. At the moment it's the single sole version. I am going to first create a pair of single-sole knee boots and if they work I'll make a overknee/plateau version and maybe a pump/sandal/ankle boot/whatever variant. I contacted several last makers and hope to be able to order the real lasts soon. Also I decided to use fibreglass/epoxy resin instead of metal shanks. Currently I'm collecting all needed materials/shops which offer them. If everything works out fine I can begin working on the real models in some weeks! Forgot to tell you one thing. I'm thinking of adding the lacing to the back of the knee boots instead of the front. What do you think about it?
-
Possibly more popular in the way of acceptance. Still we have to face that even the best fitting ballet heels are not made for everyday life, hills etc. And even the best trained wearers cannot walk naturately or fast in them. So while BHs might gain acceptance they'll always be for bedroom, fetishists and bdsm. That's my 5c.Was wondering what happened to all the other BH makers. Got a breif from Lady Lacie regarding her BH in which she walks so smoothly through the mall and found that those are Italian made by Brigitte if I got the spelling right and the company is no longer alive. There is also another subject regarding modifying BH but that is not accepting replies. Personally I have this theory that BH are not getting the popularity that they could because Pleaser is making a product that just does not fir or support or anything like that and Punitive shoes are just too price prohibitive. Another problem is that way too few places have any to examine before buying. Unfortunately I ordered mine before I knew about Funkypair where I can order then try them in the store before buying. Anyway I did get just about the right size and the pair was mostly for research so the detail that they can not be used without extensive modification was no surprise. So this makes me wonder if BH would be more popular if it were just easier to get a pair made for walking.
 ----
I'm still doing small refinements on the last. Currently reworking the toe tip.
Using Clay, a 10mm aluminum rod and some hard foam filling I blocked out a heel and a plateau prototype.
I'll get them into shape in the next weeks.
Additionally I found some fantastic silver leather I'll use for the inner.
----
I'm still doing small refinements on the last. Currently reworking the toe tip.
Using Clay, a 10mm aluminum rod and some hard foam filling I blocked out a heel and a plateau prototype.
I'll get them into shape in the next weeks.
Additionally I found some fantastic silver leather I'll use for the inner.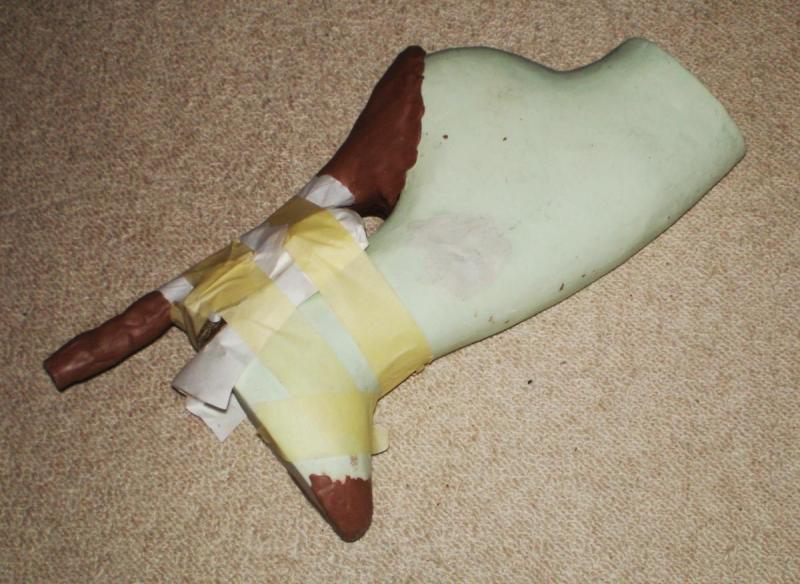


Going to create high heels by myself...
in Shoe repair and modifications
Posted
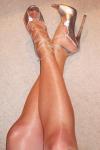
jep after all I tried to copy the arch I have when wearing my 7" sandals (u can see them in my profile pic). At the moment I don't know for sure if it fits accurately - possibly there'll be some air between the outer and my foot. If so, I'm gonna add some padding so that I don'T have to destroy the "outer arch" shape. I'm going to add some more mass to the plateau's front. Don't like how it looks at the moment. And of course the final heel will be thinner than the one showed above.