
hh&c fan
-
Posts
236 -
Joined
-
Last visited
Content Type
Forums
Profiles
Blogs
Events
Gallery
Posts posted by hh&c fan
-
-
They're going to have 3.5" plateaus and ~10" heels.
-
Hi there!
Some weeks ago I've ordered a new custom design... thought I'd share it with you.
Cannot wait to hold them in my hands and wear them!
... but it will take some months.

-
whoa they're incredible! I think I saw a similar looking sole/plateau shape somewhere... maybe at La Piazza Highheels. Not sure though.
-
For me they look like a knock-off of some La Piazza sandals.
Beware, their website is incredibly and annoyingly ugly... but still, they offer high quality handmade shoes...
http://www.lapiazza-highheels.com/newyor5.jpg
http://www.lapiazza-highheels.com/11607o.jpg
http://www.lapiazza-highheels.com/11607e.jpg
These look very close to the milanoo ones right?
-
How's it going?
Wow I've got my account back! I wasn't able to log-in, reset password or register a new account for over half a year.
And today I was just able to login again.
In summary I didn't continue work. Not enough time. I had a chat with Cos K from Fabulously Fetish and maybe I'll let them make these finally.
Of course such stuff's really expensive but who am I telling this...
-
Alright thanks for confirmation.Yes, I know that the method isn't exactly how hand swewn shoes are made but it is the same principle. BTW, how do you hold the leather while you sew? With tacks you can support it with the same finger you're pressing the leather down with...
I use waxed thread so it won't loosen immediately. Using my lasting pincers I move it into place (but not too tight) and just fix it with my thumb.
Then I make a few stitches. And finally I tighten the thread while I stretch the leather into final position.
Works well for now but maybe I'll find an easier way when I last the next pair.
-
For normal heels that's true but those plain steel heels are point-symmetric/lathed as far as I can see and measure it. (well of course you might have to drill a hole for heel tip but...)Actually no. A heel is made in all three axes.
That's exactly how "hand sewn" shoes are made...
As far as I know for "classic" hand sewn shoes upper and sole are sewn together...
What I did is to span threads from one upper side to the other. And after everything was in place I glued sole & upper together.
By now I'm not sure if I'll remove the threads or not.
Correct me if I'm wrong, but I don't think that's the classic hand sewn method is it?
-
Hmm I remember some of the photos from another web site which was said not to be reliable. But I didn't order anything from any of those so I cannot tell any facts about them.
-
Time for news! First a few words regarding lathing metal heels. I asked some guys... not really cheap, at least 50 to 60 euros. Would be alot cheaper to buy & recycle some cheap La Prima extreme metal heel high heels
Lots of trial and error. I won't go into detail that much. If someone wants to know more just ask - at the moment I don't see anyone would interest it.
The upper is made from patent leather fed with black satin like cloth. Up to ankle height it's fed with very thin shiny silver leather.
Tried to fit all needed parts for a knee high and a crotch high pair of boots on the leather skin. Was difficult but it worked out fine.
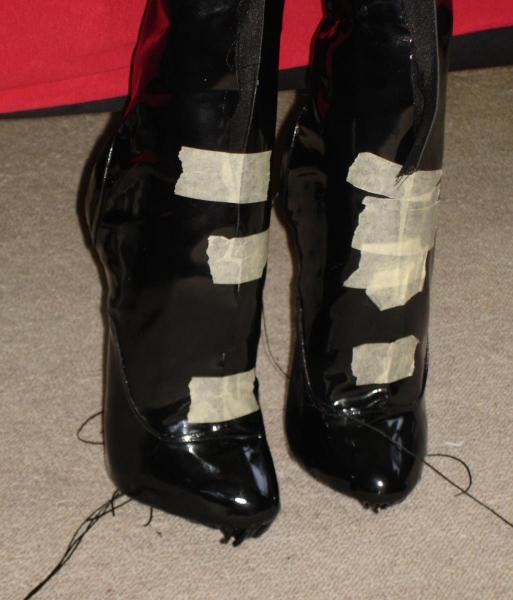
Both pattern and last might need some more modifications. It's lookin good but not perfect.
For example mid foot part seems a bit too tall while the toe box looks very short. But I think I can fix the current upper.
While sewing it was really difficult to fit toebox part and the two major/shaft parts together.
You need to do this very very exact and carefully...
Lasting...
I soaked the to-be-shaped leather areas for a few minutes in warm water.
Lasting the inner leather was easy because it is really stretchy and shaped nicely.
Patent leather's a lot more difficult. Rather solid and strong and not easy to stretch.
But that's what lasting pliers are from. Side note, I got mine from ebay.co.uk. Especially at ebay.co.uk you can find old quality shoemaker tools.
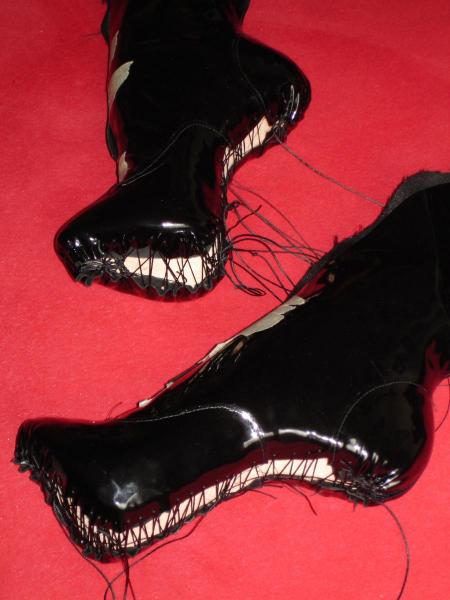
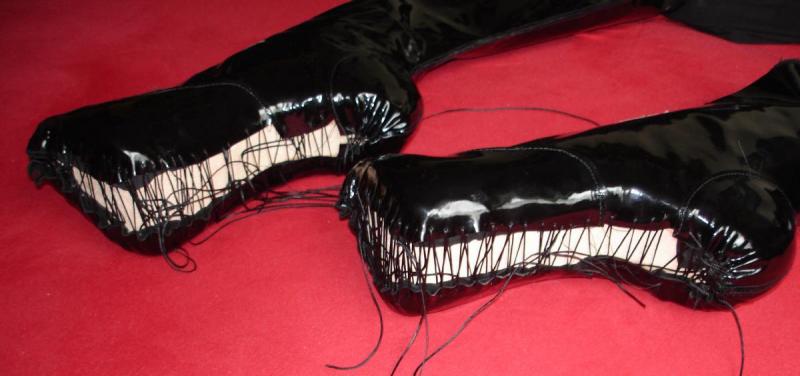
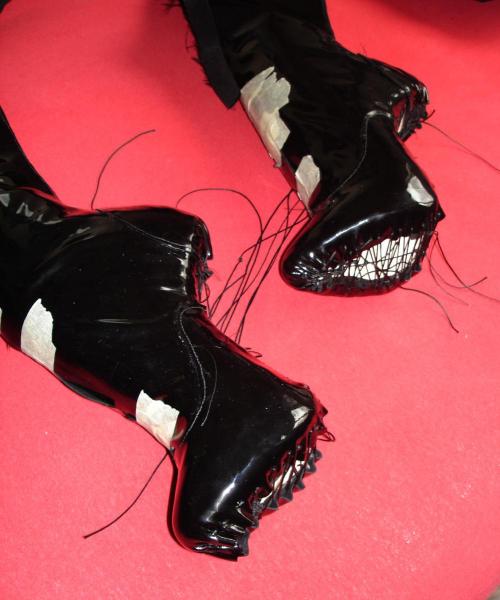
I used an own technique (well at least I think so) and it worked fine so far. instead of using nails perforating sole and possibly last, I fixed the stretched leather using very strong saddler's yarn.
I'm going to remove them and last the outer leather again so that I can be sure there are no visible deformations.
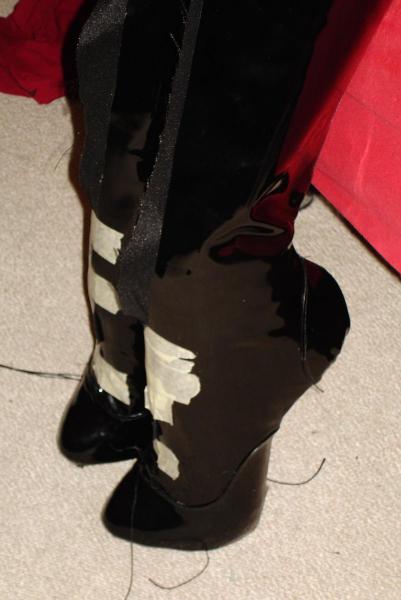
Here's how they look now.
-
Have you ever worked with a metal lathe or somebody that has one. A heel should be pretty easy to turn.
I'm sure that's right but unfortunately I don't know anyone who has a lathe.
Maybe I will find someone who can help me with that, maybe not...
However it works out I'm sure they would also look great with normal heels.
-
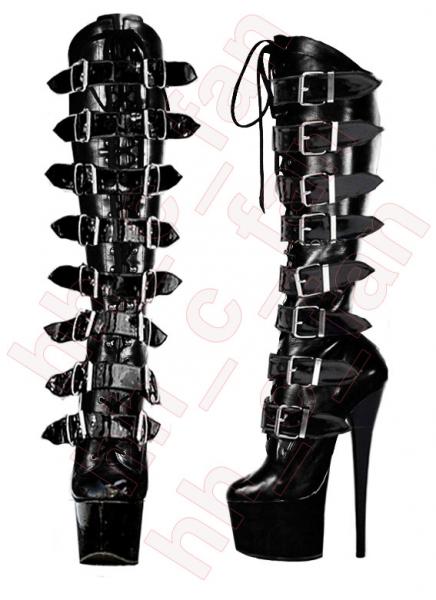
I had lots of time in the last few days but won't have much time in April/May so I did my best to make lots of progress. Unfortunately without pictures this time - thanks to my stupid cam. Result of the last days: all needed parts are glued and sewed. However I fear the pattern I created doesn't work perfectly even though I tried it with a prototype before. Luckily it will take some more time but I think I'll be able to correct these mistakes without destroying the beauty of the boots... Besides I chose the style of the boots I will create. Currently I'm working on a knee high pair which will look like the new Pleaser line - http://www.high-feelings.de/images/articles/ca7d7df59910ada335ebe6f861bc4f3c_5.jpg Patent leather, buckles, laced, if I find someone who can make them metal heels, single sole, but no zip. Style of the second pair: Crotch high, laced & zipped, possibly with plateau.
-
Hmm interesting. To be honest I was only talking about epoxy but not planning to use it: a ) because I was too lazy to write about it, look up all the english terms etc
b ) I think more people know about epoxy rather than acryl, PUR resin etc.
Seems you know more about their characteristicsso I'll go into detail now.
I'm gonna use acryl resin with fillers. Heel and shank filler might be cotton flakes or fiberglass filings. The shanks will also be reinforced with additional GRP/CRP layers.
For the plateaus (those will be done later, first version will be single sole) I plan to use a lot of lightweight fillers - after all they are about 0.7dm³ of solid material.
Regarding the aluminum rods - didn't know that, but I'm not sure if it will be a problem... The rod will be in the heel so there's no possibility it could move around or fall out.
Additionally I could roughen up the rods so that the connection should be stable. However I'll look for alternatives. -
I'd go for the ones in the first link - first of all because the second ones look terrible for me. Sooner or later any eyelet might break. Some time ago I bought knee high lace-up ballet boots for about the same price. They weren't high quality but it worked for trying out ballet heels. After a year of lacing them tightly one lacing hook ripped out. But it waws worth it. Still happy I chose a boot style. It's worth to mention the ankle boots will support your ankles alot more while these oxford style heels won't do that at all. Today I'd go for more expensive ones. Main reason is because the Devious ballet boots lool more well-shaped and asthetically.
-
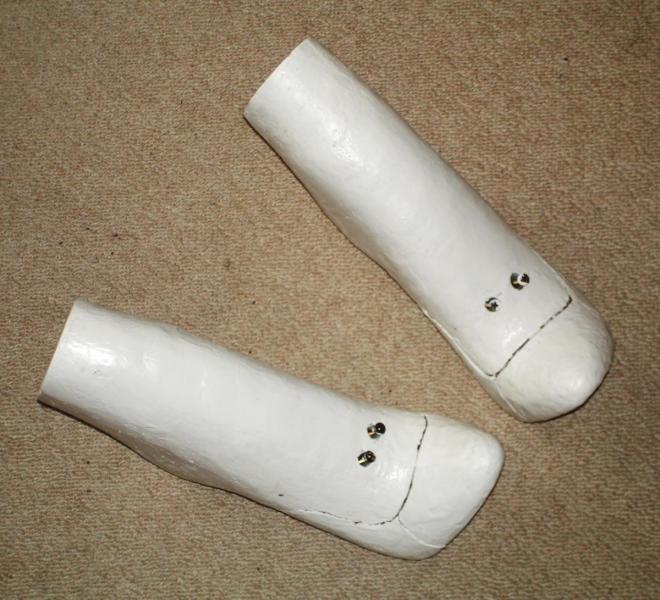
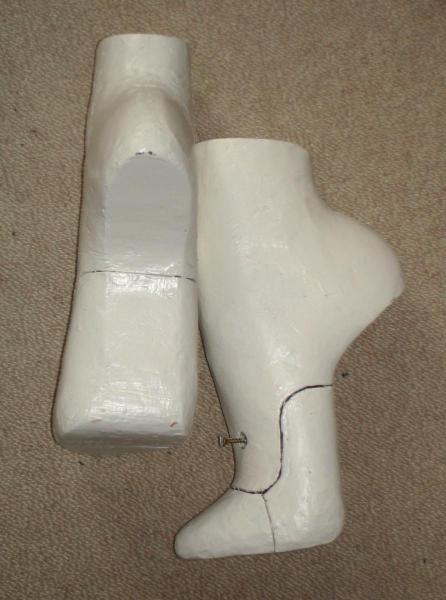
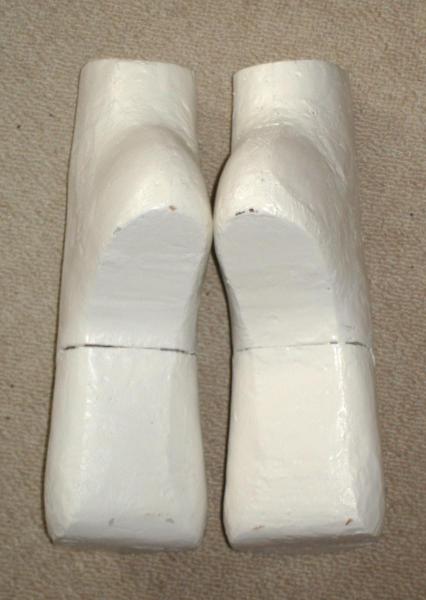
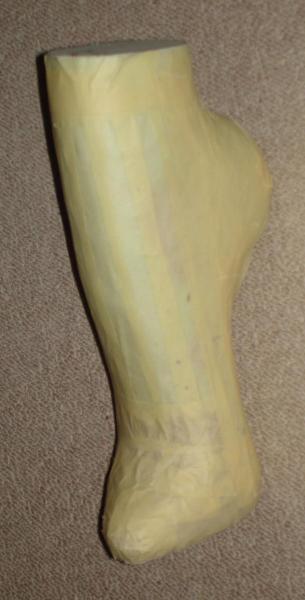
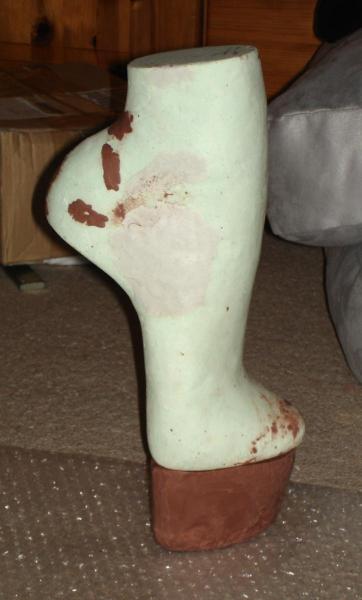
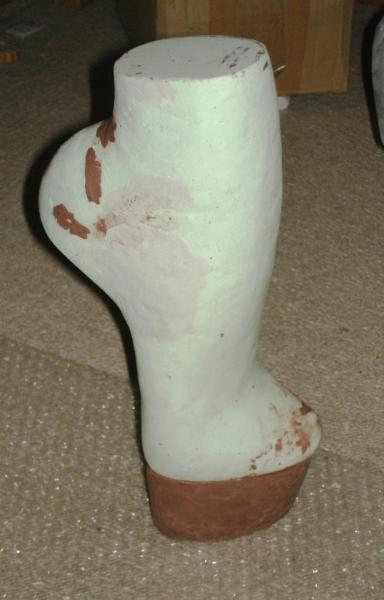
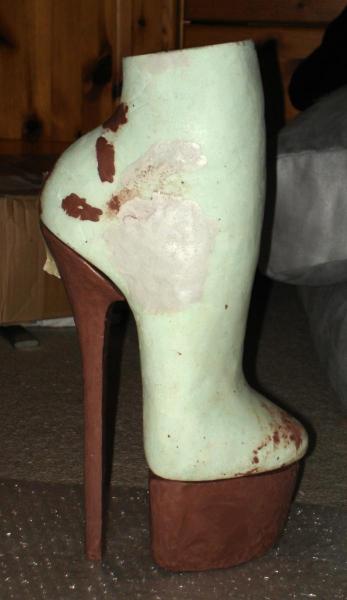
Aaaaand next one. Small update but with some beautiful images. Watching some high heel last photos I found the heel was modeled slimmer than I did for my lasts. After some measuring and comparing I decided to slim the upper heel part down, too. To protect the lasts from water (soaked leather...) and to prevent the leather getting dirty from clay - and because it looks a hundred times better
- I decided to varnish the lasts.
Because of the open-pored hard foam I had to paint it about three times.
Result: Some beautiful white lasts
Last step for todays update: I soaked the sole leather in water and moved it into right position. My solution to fix it in place was to wrap last and sole with a dish towel and secure it with a *luggage belt* (don't know what they're called in english. After all anything would work for this.) -
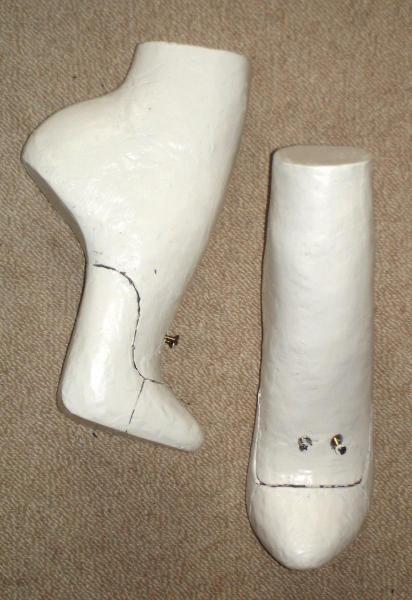
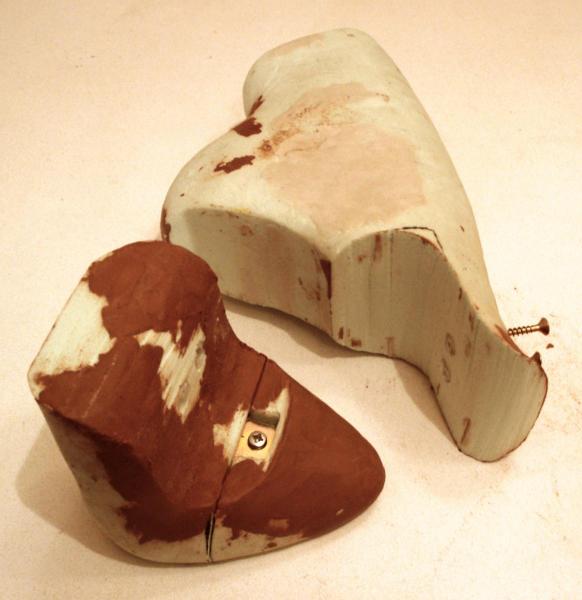
Alright it's time to show the locking lasts system.
As I only want to make lace-up style boots, it was rather easy to create a working system.
I split them into three parts. When it's time to remove the lasts, steps are
- open the boot's lacing
- unscrew and remove the lasts upper half
- unscrew toebox/arch parts and remove arch part
- finally remove the toebox.
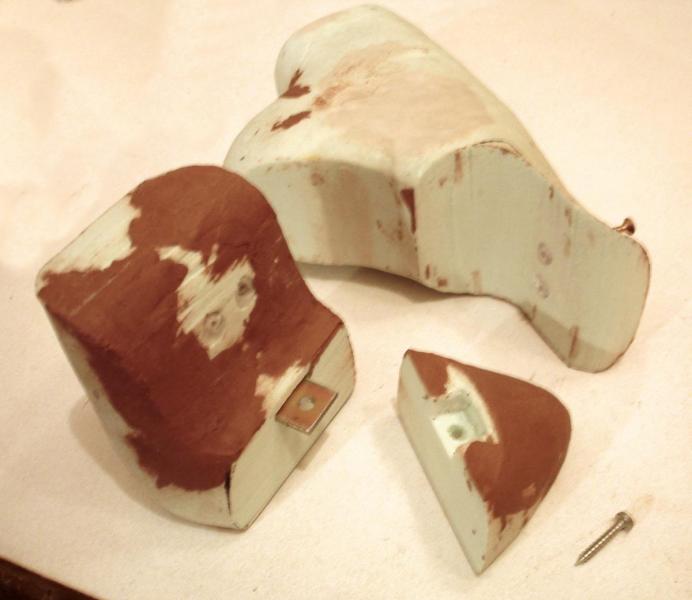
- Plan where to cut the lasts to make it work. Keep in mind all screws/mechanisms have to be accessible when the leather is stretched over it!
- Take alot of time to carefully draw your cutting lines. This is difficult as there are no orientation points or edges...
- If possible drill all holes you need. This will make sure all parts stay in place.
- I feared the foam might not not be solid enough for screwing. So I drilled large holes which will be filled with stable plastic. Later I cut a thread into it.
- If your base material is hard enough you can jus drill normal screwing holes.
- Use a jig/fretsaw to cut all parts.
- I used 'plaast' (some thermoplastic) to create the thread sockets. You need to work rather fast as it hardens after a minute or two. After heating it, stuff it into the drilled hole of one last part. Then, before it cools down, take a screw and screw it in. And there's your custom made thread! Take some more plaast or similar and put it into the other part's drill hole. Move and hold the first part into position and screw it in all the way. And that's it. Cooled down, plaast is almost indestructable!
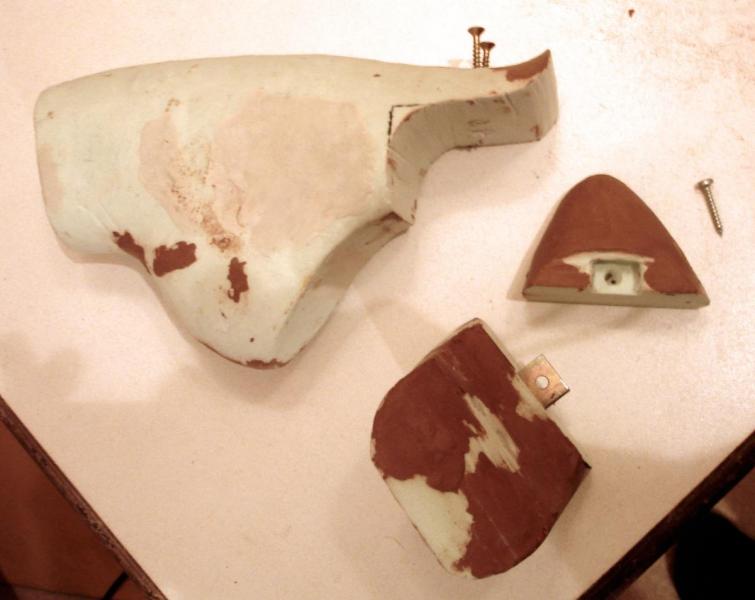
Ah but there's one thing I need to find a solution for. normally, heels are glued and then nailed to stay in place.
But that would work with wooden heels only. I'm going to cast the heels from epoxy resin plus aluminum rod.
There's no way one could throb nails in there. Any other ideas on how to make sure the heel stays in place?
I could connect it to the shank which will also be made from epoxy resin. Would be a very stable connection.
Well I'm still looking for alternatives.
-
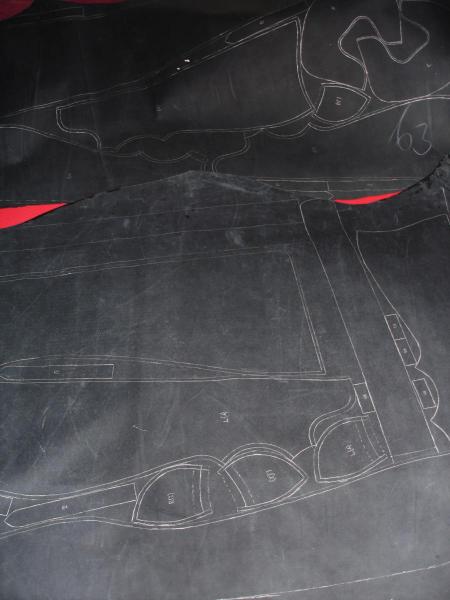
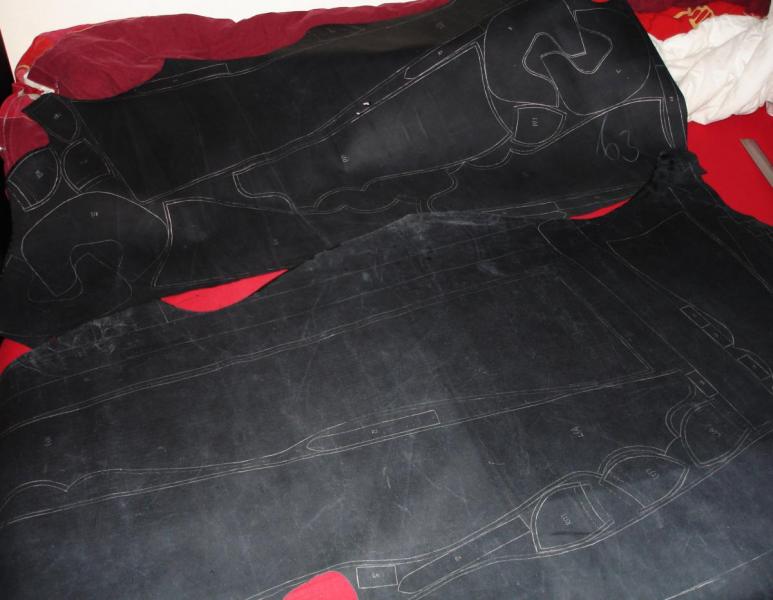
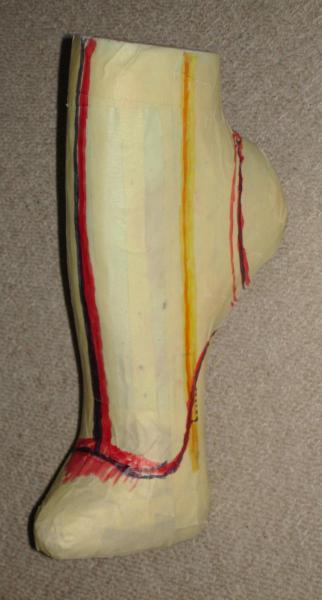
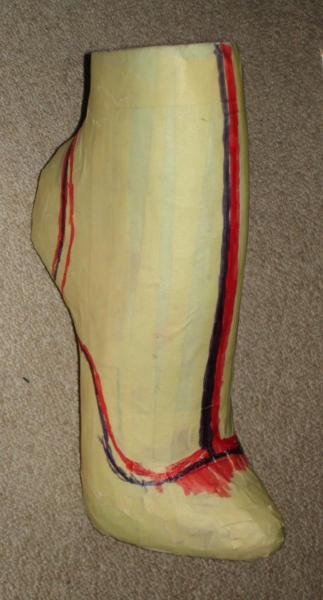
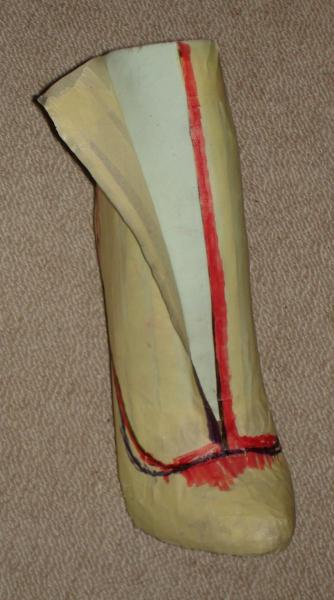
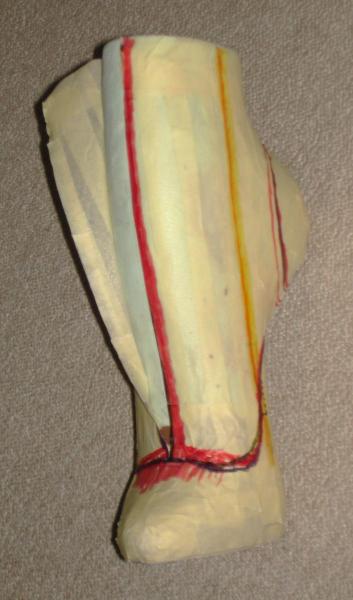
Tired and wanna go to bed. But I did alot of progress over the last week so it's badly time to show at least a bit of it. First of all thanks to you two! These images show the final last shapes and the first step of creating the pattern. Look at the smooth arch to toebox transition. Very happy with it finally
First step is to use small crepe tape to cover the whole last smoothly.
Then you can draw the desired pattern on it. As you can see it took me a few tries until I was happy with all curves and positions.
Red->sketch, black->final, yellow->markings for a possible zipper.
Finally you use a cutter to carefully remove your "prototype pattern" piece for piece.
I already finished cutting the lasts into parts and installing the closing mechanisms. In few days I'll show some pictures of that stuff. -
Thanks. Some feedback always helps me to motivate myself to continue my work
To your question - yes I think that would work fine. However the major problem isn't the profile shape but to make the straight part really straigt.
I smoothed the shape now using a rounded knife. Not perfectly straight but very close. At the moment I don't have an idea how to make it perfectly straight without CNCing.
Might be possible to correct when I casted the first heel using 100% straight aluminum rod and acryl resin.
I think I'm able to grind that one with more precision.
---
Some days ago I made another decision - I'm not going to use the prototype lasts for casting more stable lasts.
These already are very stable and I'll cover them with a thin resin layer for protection and smoothing.
So the next step I have to make is plan the sections of the last and then I have to... saw through them o.O
Ah well I'll be very careful and it should work out fine. -
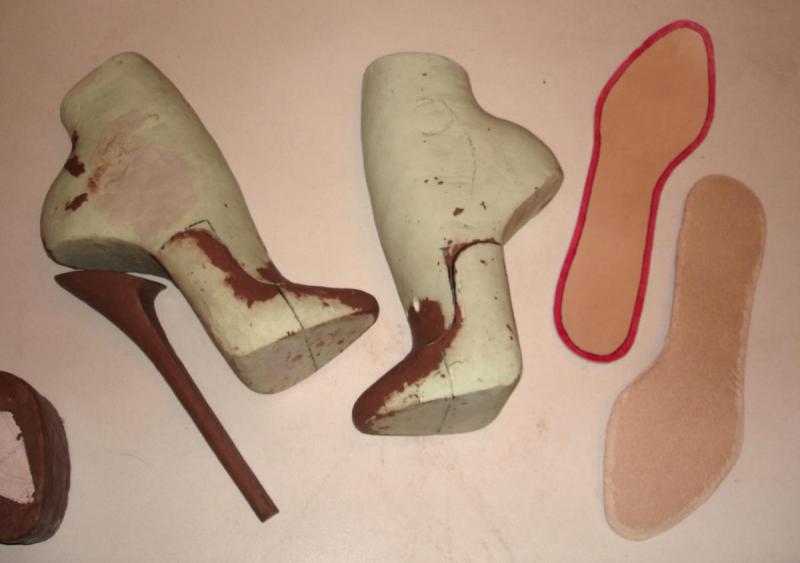
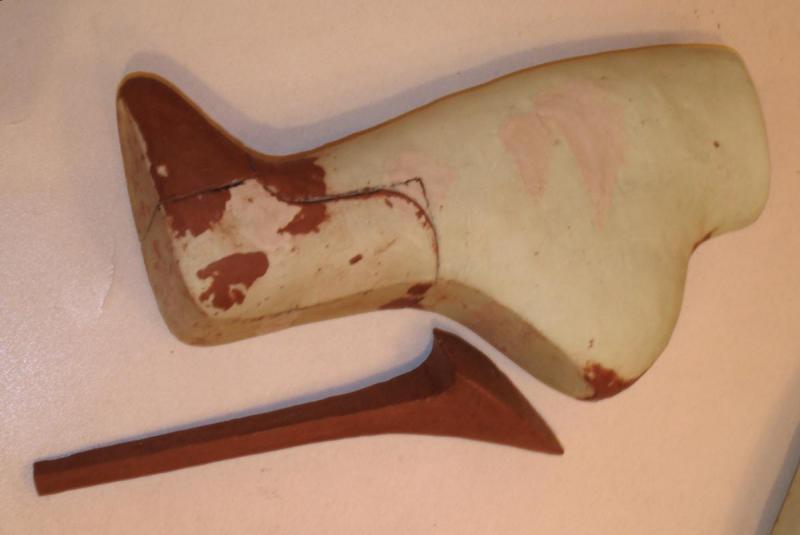
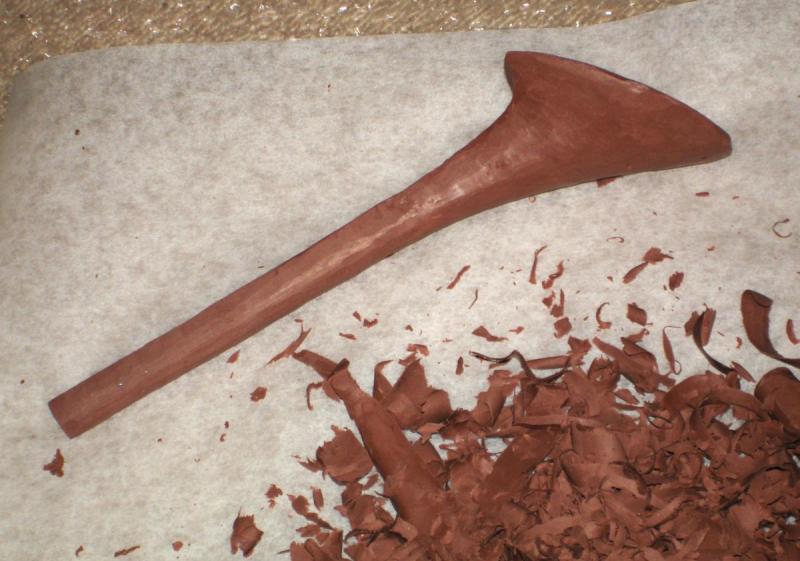
Time for an update! It's messy. While the heel works out fine I'm still not entirely happy with the lasts - toe box area to be exact. But first let's talk about the heels.
Here you see my used tools and industrial clay works after all. Rather solid and waxy, but very easy to carve compared to hard foam and wood.
If you need to, you can always heat and add some more clay.
At the upper right corner you can also see a 10mm aluminum rod I'm going to use for the casted heels (the slender heel part won't be more than the rod plus the casted sole profile).
Also wanted to use it as a frame for the heel prototype but this didn't work out well.
As I told you the clay feels very waxy. And as a result of that, it doesn't stick to the aluminum rod. When I remove the not needed half of the clay, it will just fall of the rod.
Closeup:
My solution was to rebuild the prototype heel and put a thinner, threaded rod into the clay to make sure it won't break or bend.
As you can see it comes along pretty nicely but still has some slight dents. I'm going to try to remove them by polishing the whole heel.
Last progress:
Not happy with the toe box. Looks a bit too chunky IMO. Will do another correction. Thanks to the clay you don't have to fear about removing too much material. If that happens, just heaten some clay and apply it where needed.
Plateau
As told the first pair will be without plateaus but I'm already working on the plateau so that everything fits together nicely. I think it looks too tapered. Gonna try how it looks when I shape all sides vertically.
Finally, here's a pic of all parts sticked together:
-
Yes of course! Well made Oxfords look gorgeous! And as always the higher the better
-
I don't know any specific shoe making courses in UK but found some in USA and South America. For me it doesn't seem to be unusual to see men participating in such courses. Especially when it comes to extreme/fetish high heel courses there are both men and women. As long as you want to make "normal" high heels without extreme height or unusual shape like short toebox etc you'll be able to buy lasts off the rack. However finding a lastmaker who's able to create 5"+ lasts for you is very very difficult. Additionally, extreme heels manufacturers like to keep their last suppliers as a secret. So in that case you need to create CAD data for your last and someone who can mill them - or, finally, you can build them manually. ... jep had that in mind too. Handmade gifts are lovely... and if they're even shoes?! hehe...
-
Sounds good. If you search some (more raw) supplies let me know. Thanks to lots of searching I know some good traders now.
-
I think I found that site some time ago too. There are some shops selling "normal" lasts and "normal" heels. But when it comes to a design like this it's impossible to find anything off the rack. But by now I know ways to build all required parts. Only need to buy the materials and spend some time on them.
-
HH&C, you are absolutely right. I wash't really thinking about what I was saying here (it's a common theme!). I am a practical, hands on kinda person. I have plans to build some of my own furniture which I designed from scratch on my own using some cad software (sketchup - free version from google) which I had to learn how to use. This would be no different in terms of learning curve (perhaps a bit steeper!) and ability to make things with your hands. Plus it's a quiet time of year and work doesn't really pick up properly until March so I HAVE got time. And like you say, you'll never know unless you try and if it doesn't quite go to plan then you've learned something for next time.
So everything I wrote before is rubbish and I'm going to begin the process, as you have already done, of working out how to make my own heels. Tonight.
Thanks for the inspiring words.
Haha that's sweet to hear! Hope you'll have some success.
I never used Sketchup so I don't know if it supports all features you need for designing the complex and smooth shape of a last. I used Rhino3D for that.
However I had no luck finding someone who would have been able to mill them for a reasonable price (most last makers didn't answer me at all. The only "working" offer would have been about 500€. Way too much.)
So I did it the classic way and I think this was the better way to go. I did many corrections. I wouldn't have found some errors without the possibility to compare shoes, my feet and lasts 1:1.
Uh I think I didn't understand you right. Are you talking about the steep/bowed arch at the last's front, or the stronger sole ankle from heel to arch?Be careful when going with a steep arched design. The arch of the foot is not intended to bear weight, only the ball and heel.
Either way of course I'll be careful and like all my high heels I won't use them for hiking or walking much around at all.
The arch shape was inspired by my sandals and 6ihf / archenemys. Combined with my experiences of wearability.
-
A very interesting project indeed. I've always thought about making some shoes - being able to make your own shoes to your own design and specification and, of course, a perfect fit. But it seems there is ALOT of learning, research and hard work that needs to be put in if you're going to get good results. And if you're not going to get good results then there is no point!
I don't have the time or resources at the moment but perhaps one day. I shall be watching this post...
Hmm without trying you'll never get any good nor bad results. So there IS a point in trying
However that's exactly why I'm talking about my experiences here. It's to motivate other people to invest time and try the same thing.
It's not easy for sure but also it's not impossible. So just stay tuned and maybe some day you'll try too
P.S. - To be honest I don't really have the time or resources either. But, if you really really want to try it, you gonna find some minutes and bucks here and there!

 Lots of trial and error. I won't go into detail that much. If someone wants to know more just ask - at the moment I don't see anyone would interest it.
The upper is made from patent leather fed with black satin like cloth. Up to ankle height it's fed with very thin shiny silver leather.
Tried to fit all needed parts for a knee high and a crotch high pair of boots on the leather skin. Was difficult but it worked out fine.
Lots of trial and error. I won't go into detail that much. If someone wants to know more just ask - at the moment I don't see anyone would interest it.
The upper is made from patent leather fed with black satin like cloth. Up to ankle height it's fed with very thin shiny silver leather.
Tried to fit all needed parts for a knee high and a crotch high pair of boots on the leather skin. Was difficult but it worked out fine.

 b ) I think more people know about epoxy rather than acryl, PUR resin etc.
Seems you know more about their characteristicsso I'll go into detail now.
I'm gonna use acryl resin with fillers. Heel and shank filler might be cotton flakes or fiberglass filings. The shanks will also be reinforced with additional GRP/CRP layers.
For the plateaus (those will be done later, first version will be single sole) I plan to use a lot of lightweight fillers - after all they are about 0.7dm³ of solid material.
Regarding the aluminum rods - didn't know that, but I'm not sure if it will be a problem... The rod will be in the heel so there's no possibility it could move around or fall out.
Additionally I could roughen up the rods so that the connection should be stable. However I'll look for alternatives.
b ) I think more people know about epoxy rather than acryl, PUR resin etc.
Seems you know more about their characteristicsso I'll go into detail now.
I'm gonna use acryl resin with fillers. Heel and shank filler might be cotton flakes or fiberglass filings. The shanks will also be reinforced with additional GRP/CRP layers.
For the plateaus (those will be done later, first version will be single sole) I plan to use a lot of lightweight fillers - after all they are about 0.7dm³ of solid material.
Regarding the aluminum rods - didn't know that, but I'm not sure if it will be a problem... The rod will be in the heel so there's no possibility it could move around or fall out.
Additionally I could roughen up the rods so that the connection should be stable. However I'll look for alternatives. - I decided to varnish the lasts.
Because of the open-pored hard foam I had to paint it about three times.
Result: Some beautiful white lasts
- I decided to varnish the lasts.
Because of the open-pored hard foam I had to paint it about three times.
Result: Some beautiful white lasts 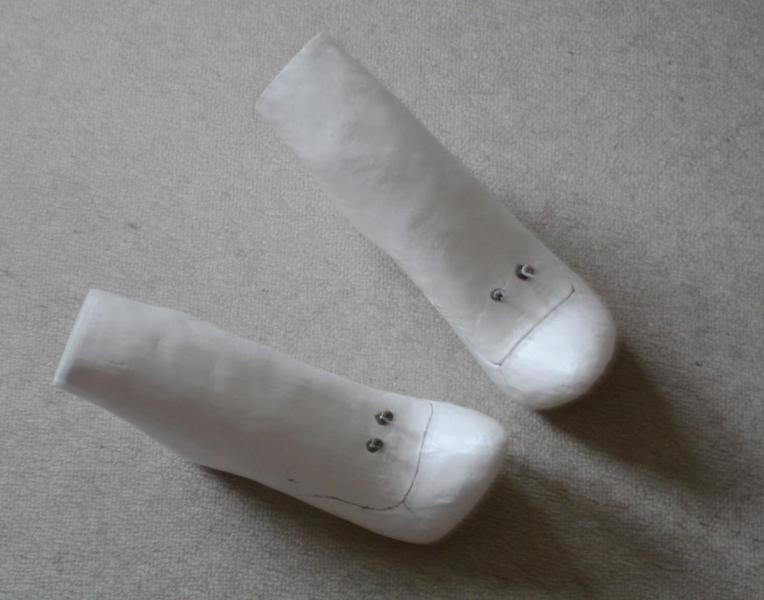


Custom Boots...
in Ultra High Heels
Posted
Hey, I knew Cos K, as we chatted about my homemade boots earlier.
I sent him a very detailed document showing what I want as precisely as possible.
Currently he's working on ordering and preparing needed parts I think.
Can't say much about the price though.
These boots need some custom made parts (heels + plateau + whatever else).
When these are done I might know more about pricing.